Showing posts with label preschool crafts. Show all posts

Tuesday, July 16, 2013

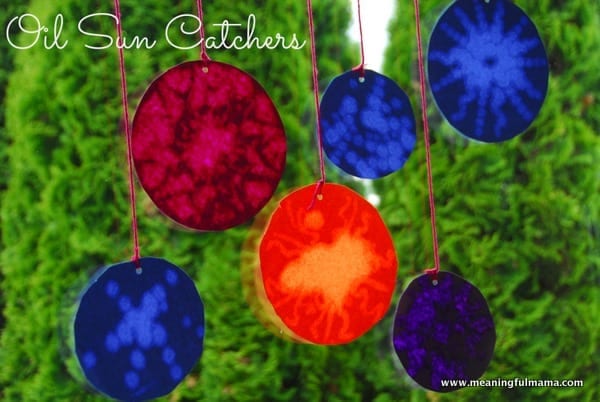
Oil on Paper Sun Catchers

Four kids....One project!! Wow!

Is it me, or do these days seem to be extra extra long??? 4 kids saying "I'm bored" is enough to make the sanest Mother crazy.... and I'm far from sane as it is! My special 'me time' is spent searching the blogs and Pinterst for any ideas to keep these guys busy so I can get a little work done....and breath. I found this post on Meaningful Mama (I just love that blog name!) and gave it a go with my brood. 3-13 year olds working on the same project...YES! That's like finding gold in my house.

Follow this link to a great tutorial and enjoy:)  MeaningfulMama.comhttp://www.meaningfulmama.com/2013/05/oil-suncatchers.html


I don't have a great picture of them all done.....we ended up spilling oil on some...hey, it happens..... This one is from the tutorial.  So pretty:)


And because I love my dogs..... Cricket before and after her summer grooming....same dog..I swear.


and that's my 5'8" soon to be 14 year old baby!!! How does this happen?????


Tuesday, March 12, 2013

Preschool Flower Lesson - Sizes


I love to use crafts and craft supplies for learning. I found these flowers on one of my favorite sites Fave Crafts at this link:   http://www.favecrafts.com/Ornaments/No-Sew-Felt-Flower-Ornament/ml/1

What little girls don’t love flowers? Not mine...they draw them, piece them together, talk to them, and put them on headbands. We love flowers. My Moon Princess is very good with her shapes and is now past this learning activity, however she’d make them every day if I had it set up for her.  She is getting better and better with her ability to cut and place tape. 

You know this is a skill if you have ever had your little one stick half of roll of tape to itself when they are unrolling it! Little E is mastering her sizes and following directions….OK, she isn’t really mastering the directions part…but we are working on it.

The pictures tell the story. They loved this craft and had many cute flowers that I will use in a future project for them. I hope your little ones (and you) enjoy this.

Materials:


Felt  or construction paper of different colors – prep the shapes a head of time.

Double sided tape ( I use the kind I use to make headbands)  or glue sticks with the paper

About an hour of free time. Really, it took us that long to play with all the color combos before they taped them together.
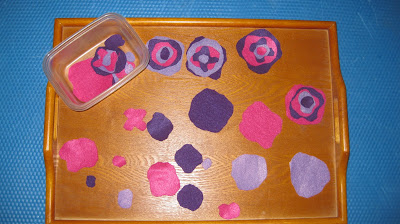

I like to have the trays prepared for them.

They usually find it easier to work at the table, but I like the trays because they can take the whole project over to their mat if they wanted to.


The finished flowers all sorted by shape....Little E did the Felt (3 yrs old)
 Since my girls surprised me and did the opposite tray than I thought they would, the felt was actually left unattached. My 4 1/2 year old could have done the double sided tape, but not my 3 year old. They wanted to keep them so they could continue to play with them and didn't want them put together. They really really enjoyed this!

I made up the same project in paper because I thought it would be easier for Little E.


My Moon Princess actually choose to do the paper shapes..she liked the glue stick:)
 They did want the paper flowers put together. I think we are going to have paper flowers everywhere soon:) They really loved playing with the shapes and sizes. I had Little E line them up and go through and tell me which one was bigger or smaller. (or the baby ones and the Momma ones as we say in my house) I highly recommend this project. Simple, yet she mastered her size variations.


We did finish one up so we could keep it and to use for the example. I sewed a bead in the center and secured a pin to the back....I love it. I'm putting it on my coat today.


Friday, February 8, 2013

Counting with Crafts

This was a lesson in number recognition for my 4 year old and a counting tool for my 3 year old. We "play school" in our craft studio and always use our crafting tools for everything...in part because they are everywhere. (I'm always working on my organization)


 It takes no time to prepare and I keep this on our school shelf with the basket of jacks for our "free choice" time. Once they understand what the tool is for they can go  back to it whenever they want. We like pink in our house if you can't guess, so I simply used a ruler to grid out 12 columns. We are working on 1-12, some use 0-10. My Moon Princess was getting stuck with the "eleventeen" and skipping 12 for a little while until she was able to really see them written in this concrete way. Numbers are very abstract and they really do need to see them in this way to connect the number and the quantity.


MP places which ever objects she chooses to equal the number at the top of the column. Sometimes you have to smooch them in when you use bigger objects.  I allow her to do this completely on her own and it takes some re-counting....which simple means reenforcing on her part. At first you can have them go in order and they can see how each column has one more object than the last. Once they are secure in this you can have them work backwards, learn even / odd numbers, ask for only specific numbers, or count by 3's or 4's. This becomes a game and with simply a sheet of paper and some odds and ends you have a very complete lesson and a lot of fun.

.
 My 3 year old focuses more on the counting of the objects for each column once her sister sets it up for her. One thing I am careful about is keeping tools like this only on the lesson shelf. It's important to learn respect for these things and I believe that leads to them placing a higher value on education. 


 At the end of each play school we enjoy free art time. We love water colors!

Really....you expect me to smile?

Tuesday, January 22, 2013

Puffy Paint


Materials needed:

closeable plastic baggies - one for each color
Into each bag put -
 - 1/2 cup flour
- 2 tsp baking powder
- 2 tsp salt
- 1/2 cup water with more on hand to reach desired texture
- food coloring
- card stock.  The moisture makes paper curl..so cardboard would be great. 


 Half the fun with the puffy paint was making it.


Just snip off the corner and squeeze into the bottle....no mess! I bought these off of Amazon for about $3 but I am going to remember to save our mustard bottles from now on.


 I always have their old cookie sheets ready to go. We do most crafts on these and they are so easy to clean no mater what kind of project you are doing. (I keep their play-dough in a plastic container on them and leave it sitting on the table all the time. Great for when I'm making lunch! )
 Keep the constancy thin enough to come out easily but thick enough to keep it's shape. I had to add water after a while.

Beautiful Artist

Yes, it's safe to eat......


I found this through a picture on Google images and checked out a number of recipes. I never have self-raising flour or shaving cream so I felt discouraged. I really try to make our crafts out of stuff I have around the house otherwise I'm afraid of going down that slippery slope of supporting our craft habit. I'm sure some of you can relate:)

I found these directions and voila...I knew this was the one. This is from Tried and True (click on the link)  There are all kinds of great ideas on her site!


Some tips:

Our paint thickened up as we went....we played with them for a while. If this happens just add more water and shake really well. I also had a hard time with clogs. You'll want to make sure it's mixed up really well and you might have to rinse out the top a few times. My youngest had some problems with it a while before I realized it was partially clogged.

 I opened the microwave to find my towel and my daughters picture had brown burn marks. That was the last time I set the time to 1 minute! Some microwaves are stronger, so keep an eye on your work. I highly recommend drying the pictures in short bursts so you can keep an eye on it. I did 30 seconds at a time and stopped as soon as it was dry enough. Warning though...it must be dry "enough" or you may find some mold at a later date. We don't tend to keep stuff we make for very long...or we would be surrounded!

 Keep your water glass away from a thirsty kitten.....he has his own water but ours must taste better. He even tries to steal my tea!


Francis our dog-cat.<3

Sunday, January 13, 2013

Muffin pan crayons


The finished crayons
 These have all ready been used in hours of pretend play...none of which included actual coloring.
I didn't shave the old crayons...I just cut and let the girls sort them how they wanted.


We made these up while we were waiting for cookies to come out of the oven. I'm cheap..I mean thrifty smart.. and didn't want to run the oven without another use. I had the oven set at 350 degrees and stuck these in as soon as I took the cookies out. I just watched them, so I don't have a set time to tell you.

One thing I will say about how they came out is that we needed to sand the smooth side a bit to color. There was residue from the non-stick spray I used. I'm guessing you could do it without the spray, but the directions that I remember called for it. My girls mostly like these for "jewels" but we will also be using them for plastic leaf rubbings later this week.

This is the new smile face:)


Wednesday, December 5, 2012

Sparkling Christmas Tree Ornaments


My girls love glitter. They could put glitter on everything if I let them. For these ornaments I cut half circles out of card stock and glued them into a cone. I glued ribbon with a small knot in it on the inside of the cone for hanging.  I did the prep work a head of time to keep everyone happy once we sat down to the craft table. My girls are 3 and 4 years old. My 4 year old is very good with her hands, but I still find that it keeps her interest more if I do the prep work when there is drying time involved. 

Once the cones are done I hand them over to the girls and let them do all they want to them. They painted white glue all over the outside of the cone and then held it over the glitter bowl.


 To add a bit more bling they added some sequence with dabs of glue around the ornament. Once they dry they can go right on to the tree or to a Grandma:)


This is how my Coton de Teluer and our kitten sleep all the time now. They are the best of friends.
3 of my babies